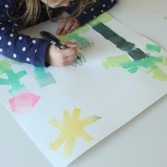
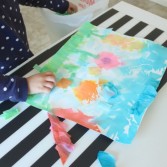
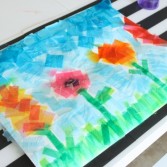
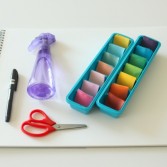
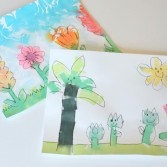
Spring is finally here! Let’s make some beautiful spring art with the kids just to celebrate the beginning of the season of the nature’s awakening and simply have fun. You only need a few materials to make this tissue paper bleeding artwork with children and by the way, it’s mess free! If you’re ready to get started, gather the supplies, which are squares of tissue paper, a small misting bottle filled with water, a pair of scissors and a thin black marker. So, the trick behind this interesting technique is about transferring the color from tissue paper onto another surface – watercolor paper. Visit theimaginationtree.com for proper instructions and create, create, create!
Beautiful DIY Spring Tissue Paper Bleeding Art For Kids
Wed, Mar 11, 2015 | DIY Projects
Advertisement |
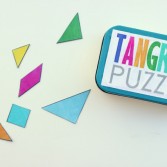
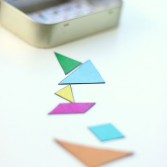
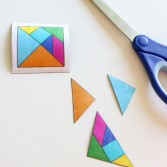
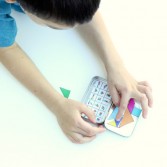
Magnetic DIY Travel Tangram Puzzles To Develop Your Kids
Wed, Mar 11, 2015 | DIY Projects
This project is a great and funny brain game. Your kids will love it! You will need magnetic paper, altoid boxes, print out of tangrams and idea sheets, paper scissors, gel medium or Mod Podge, foam brush and glue stick. Print out your tangram images. Adhere the tangram images to your magnetic paper. Apply gel or Mod Podge to the tangram squares. Then glue the tangram idea charts to the inside of your Altoids tins. Apply a generous, even coat. Add the label to the front to cover the branding. Let everything dry completely. The rest of the tutorial is here.


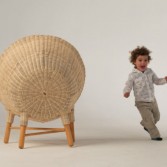
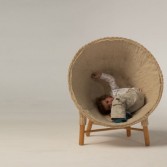
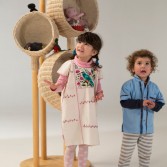
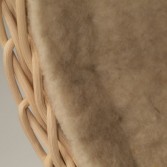
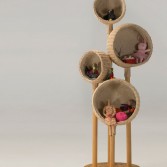
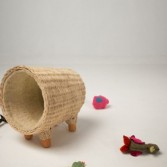
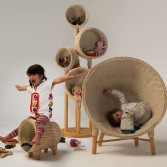
Contemporary And Functional ‘Traven’ Furniture Collection For Children
Tue, Mar 10, 2015 | Furniture sets, Kids room
If you’re ones of those parents that love unique and ultra modern furniture, you gonna love this Traven collection by Christian Vivanco and Nido Muebles. It’s represented by woven furniture made of wicker, certified wood for children that consist of an armchair, a stool and a toy box. None of these objects look like average pieces of children’s furniture, instead they reflect a truly original and rather extraordinary approach to design, choice of materials and an ability to adapt to any environment. All in all, this playful set can provide your kid lots of fun: children can climb on this furniture, store their toys, or just sit on it. Take a closer look to all of these incredible design pieces and check out the store if you like them.
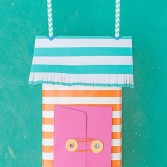
Sunny DIY Mini Beach Bungalow Gift Wrap
Tue, Mar 10, 2015 | DIY Projects
We are all waiting for summer days, though the spring has just begun. So if you are preparing a party for your kids, take this idea and add summer details to it. You will need tea boxes, colorful gift wrap or construction paper, red stamp paper party straws, Mara-Mi greeting cards and envelopes, scissors, tape and Mod Podge. Choose a wrapping paper that gets you in a beach state of mind. Wrap your tea box in the paper of your choice and secure with tape. Choose a greeting card to use for the roof. Use your scissors to cut your card to the length of the box. You may have to take a 1/2 inch or so off your greeting card to match it to the size of the box. Again, use your scissors to cut fringe for the front side of your hut. The rest of the tutorial is here.
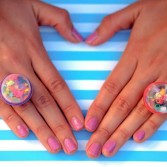
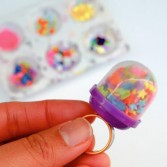
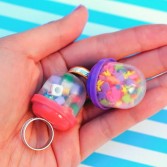
Whimsy And Easy DIY Vending Machine Bubble Ring
Mon, Mar 9, 2015 | Accessories, DIY Projects
If your child loves everything about big and colorful jewelry, make some together! I found the easiest tutorial, which allows you to transform a vending machine container into whimsy jewelry. Sounds so much fun, right? First gather the supplies, which are super glue, plastic container from Toy Vending Machine, toy ring, sprinkles, sparkles and beads. Begin with washing and drying your plastic container. Then super glue your ring onto the top of the container. Next fill your container with lots of different sprinkles and sparkles. Finally, slip the top back onto your container. That’s it! Now you got such a cute statement accessory to wear!
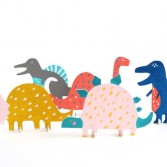
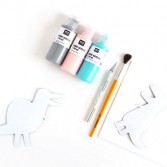
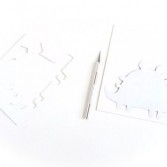
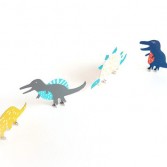
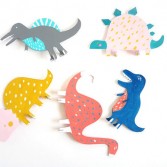
DIY Dinosaur Cut-Out Toys For Your Kids
Sat, Mar 7, 2015 | DIY Projects
Dinosaurs are so cute and funny so why not make some for your kids? For this project you will just need printable dinosaur templates, cardboard or thick paper, scissors, craft knife, paint and super glue. First of all print and cut all the dinosaur shapes from the templates. Then trace the dinosaur silhouettes onto your cardboard or paper and cut out. Next you need to help your dinosaurs stand by themselves, so you can cut out small rectangle pieces from your cardboard and attach the notches to your dino’s feet with super glue. Now it’s time to paint and play!
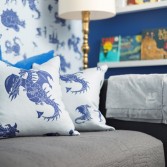
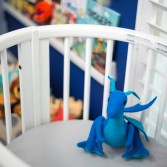
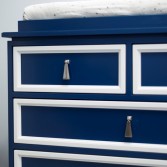
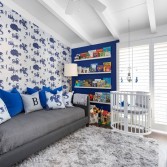
Navy And White Baby Boy’s Nursery Design With An Accent Wall
Fri, Mar 6, 2015 | Kids room
If you’re seeking for some boy’s nursery inspiration, come and join us on today’s tour around the space created for baby Bosley. “The Guncles” Bill Horn and Scout Masterson discussed lots of different options and themes, but decided not to stick with some current trends and trust their own fashion taste and intuition. It all started with an awesome medieval castle and dragons wallpaper from Paper Boy London. They decided on the navy, white and pale blue color scheme, which looks incredibly good in a boy’s nursery. As for the furniture, I’m in love with their choice of the crib, which has wheels, so it can be easily moved anywhere, and gorgeous Straight and Narrow Bookledges from The Land of Nod. Scroll down to see all of the photos of this clean and modern room and get inspired!
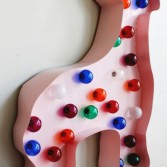
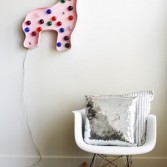
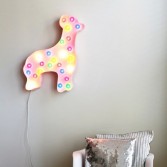
Easy DIY Giraffe Marquee Light To Hang In Your Kid’s Room
Fri, Mar 6, 2015 | DIY Projects
If you’re looking for a cute and easy décor piece to jazz up a little a blank wall in your kid’s room, think over making this sweet marquee light. It’s super easy as well as super cheap, so it may be a delightful addition to your child’s space. Here’s the list of supplies that you need to make it: foam board, poster board, globe lights, hobby knife, hot glue gun or tape, spray paint and large giraffe outline. Head over to ajoyfulriot.com to grab the outline for this giant giraffe and read all of the proper instructions. Have lots of fun!
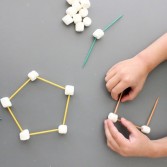
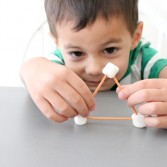
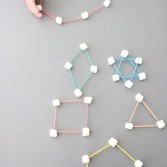
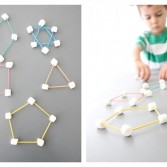
DIY Marshmallow And Toothpick Shapes To Develop Kids
Thu, Mar 5, 2015 | DIY Projects
If your kids are small, they need to learn about everything. For example, shapes as a triangle, square, rhombus and many others. But if you show these shapes and just name them, it won’t be so interesting. So let’s turn simple learning into an exciting activity game! For this project you’ll need marshmallows and toothpicks. That’s all! First you need to talk with your kids about shapes and colors (find the multi-colored toothpicks) and count all toothpicks. You can make 2D shapes but if your kids are ready, you can create with them 3D shapes. We are sure that you and your kids will fall in love with this game!
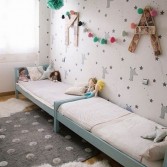
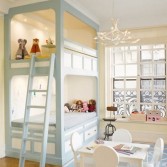
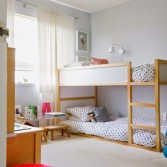
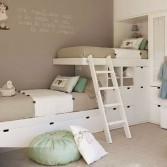
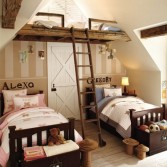
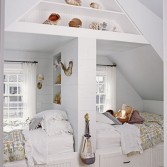
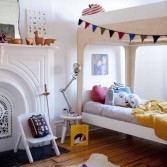
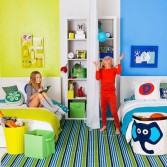
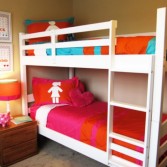
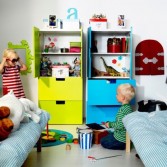
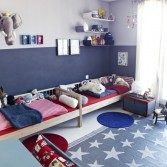
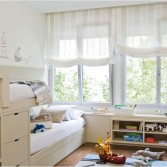
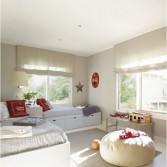
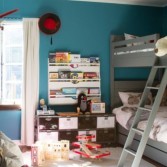
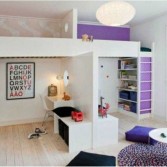
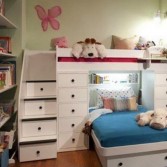
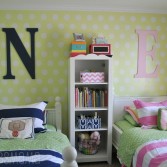
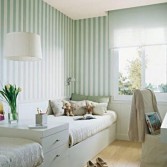
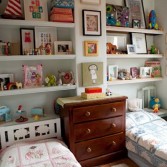
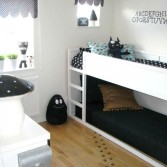
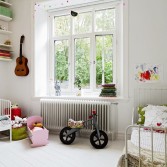
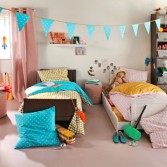
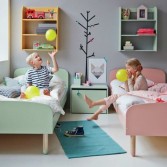
4 Clever Tips And 29 Cool Ideas To Design A Shared Room For A Boy And A Girl
Thu, Mar 5, 2015 | Kids room
We don’t always have an opportunity to provide our kids separate rooms. Well, it’s not a reason for blaming yourself, especially when you have such cool options for them to share a room. Probably, making a space welcoming and satisfying for both kids of different sexes seems to be the hardest task. So, how to design a room taking into account completely different children’s interests?
- When picking a room’s color, pay attention to neutral shades. Add some colorful patterns, make accents by adding a colorful pillow or a rug, so that the room wouldn’t look boring.
- Carefully think over storage options, it not only will make it easier to clean everything up, but also designate each child’s personal stuff.
- Choose simple and functional furniture like compact bunk beds. If you want to personalize the interests of each child, ask them to choose the bed linen themselves.
- Decorate your interior together with your children so that you could consider each child’s ideas and wishes.
To illustrate that these tips are actually working, we’ve gathered an awesome gallery filled with shared kids’ rooms for boys and girls. Enjoy!


Categories
Archives
- May 2015 (29)
- April 2015 (44)
- March 2015 (42)
- February 2015 (38)
- January 2015 (41)
- December 2014 (31)
- November 2014 (41)
- October 2014 (46)
- September 2014 (41)
- August 2014 (41)
- July 2014 (44)
- June 2014 (38)
- May 2014 (39)
- April 2014 (43)
- March 2014 (39)
- February 2014 (38)
- January 2014 (43)
- December 2013 (37)
- November 2013 (39)
- October 2013 (47)
- September 2013 (38)
- August 2013 (44)
- July 2013 (42)
- June 2013 (38)
- May 2013 (42)
- April 2013 (44)
- March 2013 (42)
- February 2013 (40)
- January 2013 (41)
- December 2012 (31)
- November 2012 (45)
- October 2012 (57)
- September 2012 (39)
- August 2012 (45)
- July 2012 (39)
- June 2012 (8)
- March 2011 (8)
- February 2011 (7)
- October 2010 (8)
- September 2010 (20)
- August 2010 (21)
- July 2010 (6)
- June 2010 (8)
- May 2010 (8)
- April 2010 (24)
- March 2010 (27)
- February 2010 (16)