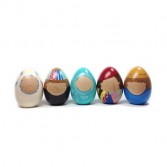
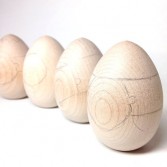
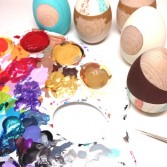
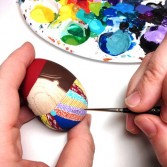
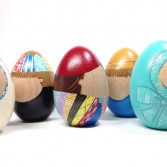
We love creative crafts that make you and your kids smile! Find free time and create these emoji Easter eggs with your kids. For this project you will need eggs (you can use real eggs or paper mache eggs), yellow, white, pink and turquoise craft paint and black and red paint markers. So you’ll need to paint all eggs yellow and let dry completely. Then take other paints and paintbrushes and start to draw faces. You can look at pics, read and understand in which order you can draw each one! Try to draw very carefully and make your emoji faces very similar to real ones. Happy Easter!
Super Funny DIY Emoji Easter Eggs
Thu, Apr 9, 2015 | DIY Projects


Advertisement |
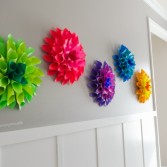
Bright DIY Rainbow Paper Dahlia Flowers To Make
Wed, Apr 8, 2015 | DIY Projects
If you’re looking for some easy craft to get your kids involved in making, you gonna love today’s DIY. These paper flowers look fantastic on the wall, they’re cheerful and really colorful. There’s nothing difficult, so even preschoolers can enjoy crafting with you. To make the flowers you’ll need 10 sheets of 8.5” x 11” ASTROBRIGHTS PAPERS per flower, scissors, pen, low temp glue gun, paper trimmer and cardboard. First cut a 6.5” circle out of cardboard. Then with your paper trimmer cut out your colorful paper into rectangles (4.25” x 5.5” approx.). Continue reading at craftaholicsanonymous.net and complete the tutorial. Enjoy!

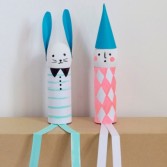
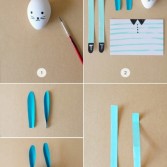
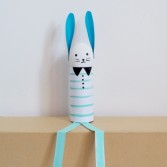
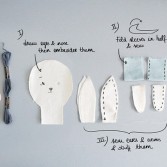
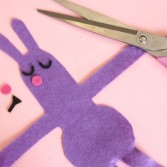
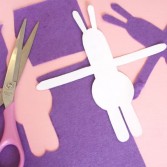
Original DIY Bunny And Clown Egg Characters For Easter
Wed, Apr 8, 2015 | DIY Projects
Have you already thought about Easter décor for your kids’ room? Make eggs characters this Easter and put them on a shelf! It’s so simple! You will need template for bunny and clown egg characters, 8,5×11 sheet of card stock, plastic or hard boiled egg, paints, markers or crayons for clothes, adhesive such as strong tape or glue. Begin by painting on a face to your hardboiled or plastic egg. Let that dry. Print out clothing items onto white, colored or patterned paper. If you wish, paint details onto each piece for the bodice, legs, ears and hat. Fold the ears together at the base and glue. Then using hot glue, glue the ears to sides of the egg head. Next steps of the tutorial are here.
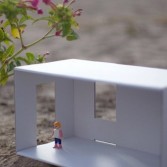
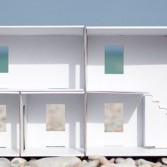
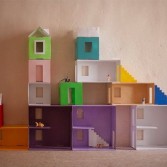
A Perfect Dollhouse Kids Can Easily Make Themselves
Tue, Apr 7, 2015 | Other
Finding a perfect dollhouse that gets your kids into excitement yet doesn’t break your bank isn’t the easiest task. The solution to make your own is a great idea. Guys at Kids’ Mobile Box know that and created a recyclable, modular, choose-your-own-adventure style of dollhouse in the cardboard box tradition with infinite possibilities. Their unique design allows you to put together a dollhouse just the way you want it to be. The walls can also be decorated with stickers for a personal touch. Sounds so cool, right? I think kids will love it so much! Be sure to check this out!
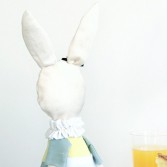
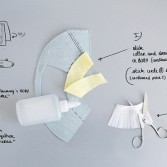
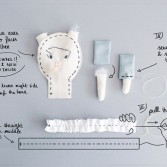
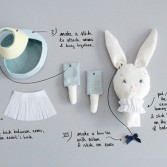
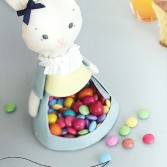
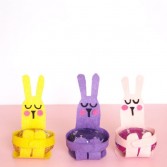
Easy-To-Sew DIY Easter Bunny Candy Holder
Tue, Apr 7, 2015 | DIY Projects
Kids love candies and toys, so what if we’ll combine these two things together? And we’ll get a cute bunny candy holder! For this craft you’ll need printable template, fabrics of different colors, threads, pencil, ribbon, stuffing, needle, glue, scissors, cardboard and sewing machine. Download the pattern, scale to 400% and print. Cut out the template shapes and trace them into your fabrics and cardboard with a pencil, then cut out. Glue the collar and dress pieces onto the body piece. Glue fabric circle A on bottom. Fold body and stick it onto the glue area. Then glue the body and bottom pieces together. This will serve as a pocket for the candies of your choice. The rest of the instruction is here.

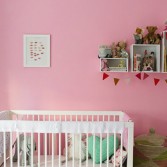
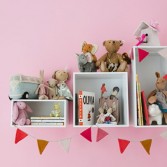
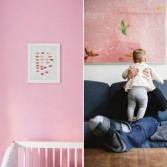
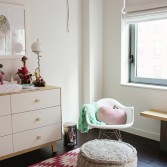
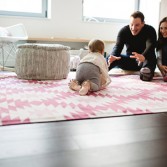
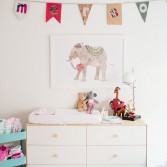
Serene And Stylish Sweet Pink Baby Girl Nursery
Mon, Apr 6, 2015 | Kids room
Hey there, dear readers! Today’s nursery is so neat, no doubt you gonna fall in love with it instantly. We did! It’s definitely a room for a charming baby girl to love and live in with all this incredible stuff from a pink rug, a sweet apple pillow and an adorable bunny lamp. There’s so many other cool and whimsy details that make this room look unique and pretty. Have you noticed lovely elephants here and there? I can’t take my eyes off this awesome watercolor print above a dresser. Everything in this room is so serene and wonderful, makes me think the space will be loved for years. Enjoy the photos with the cutest little pup and get the inspiration!


Amusing DIY Family Custom Wooden Eggs
Sat, Apr 4, 2015 | DIY Projects
Easter is a family holiday, so offer an idea to make custom wooden eggs to your kids. You will need wooden eggs, pencil, paint brushes, non-toxic acrylic paint, a polyurethane sealant and favorite photo of your family. Let your kids choose a photo where the family is wearing bright, colorful garb. Begin by lightly sketching an outline onto the bare wooden egg. Start with the face and move outward to clothing and hat and hair details. Grab your brush and paint and start filling in the spaces. You’ll need a thin brush for the details. Once finished and dried, it is your choice whether to leave the pencil marks for a more detailed look or to erase them. Coat your eggs in 2-3 layers of the sealant, allowing each layer to dry in between. Give them an hour or so to dry. Now it’s time to play!
Adorable DIY Easter Egg Bunny Hugs
Fri, Apr 3, 2015 | DIY Projects
Time flies, doesn’t it? Easter is almost upon us, so make sure to find the time for holiday-specific craft fun with your kids. Today we suggest you to make these adorable Easter egg bunny hugs. They’re super easy and simple and they’re a perfect treat which will put a smile on your guests’ faces. Here’s the list of supplies that you need: colored felt, craft glue, scissors, Easter egg bunny hug template and small – medium (approx. 17 gram) chocolate eggs. To begin you should download, print out and cut the template. You can find it and read full instructions also at bkids.typepad.com. Head over there and enjoy!
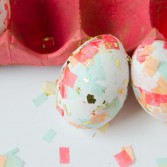
Colorful DIY Confetti Easter Eggs
Fri, Apr 3, 2015 | DIY Projects
One more Easter craft today! Invite your kids to join you on this pretty DIY confetti Easter eggs and let’s have some fun! The tutorial is easy-peasy, so you can just gather the supplies and let your kids to the work. Materials that you need are large eggs (boiled, hollowed out or fake), confetti (you can make them by cutting tissue and gold foil paper), Mod Podge or Decoupage, sponge brush and egg carton. Begin with grabbing one of the eggs and painting it with Mod Podge. Then roll your sticky egg in a plate of confetti, leaving just a bit of a white space. Let dry completely in the egg carton and then cover it all again in Mod Podge. While it dries, decorate the other eggs.


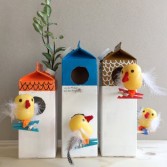
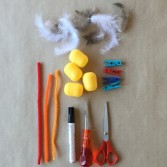
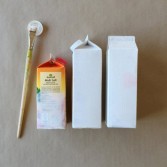
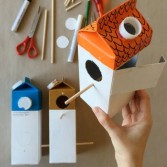
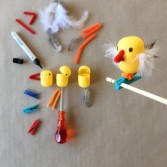
Fun DIY Milk Carton Birdhouse Village
Thu, Apr 2, 2015 | DIY Projects
Today you can create this wonderful village for birds and of course little birds too! For making birdhouses you’ll need 3 empty milk cartons, 5 chopsticks, acrylic paint (white, orange, blue and brown), painters tape, craft knife, reamer, scissors, permanent marker, pencil, paint brushes and bottle caps (palette). For making birds you’ll also need 4 small plastic eggs, feathers, pipe cleaners (1 red, 2 orange), 4 clothespins. Let’s start to create birdhouses! Cover your cartons evenly with white paint. Let dry and repeat 3-4 times. Wrap one piece of tape around the top fourth of your carton, sectioning off the roof from the rest of the house. Paint these top sections with your orange, blue and brown paints and let dry. Then remove the tape, slowly and carefully. If you wanna know what’s next, read here!

Categories
Archives
- May 2015 (29)
- April 2015 (44)
- March 2015 (42)
- February 2015 (38)
- January 2015 (41)
- December 2014 (31)
- November 2014 (41)
- October 2014 (46)
- September 2014 (41)
- August 2014 (41)
- July 2014 (44)
- June 2014 (38)
- May 2014 (39)
- April 2014 (43)
- March 2014 (39)
- February 2014 (38)
- January 2014 (43)
- December 2013 (37)
- November 2013 (39)
- October 2013 (47)
- September 2013 (38)
- August 2013 (44)
- July 2013 (42)
- June 2013 (38)
- May 2013 (42)
- April 2013 (44)
- March 2013 (42)
- February 2013 (40)
- January 2013 (41)
- December 2012 (31)
- November 2012 (45)
- October 2012 (57)
- September 2012 (39)
- August 2012 (45)
- July 2012 (39)
- June 2012 (8)
- March 2011 (8)
- February 2011 (7)
- October 2010 (8)
- September 2010 (20)
- August 2010 (21)
- July 2010 (6)
- June 2010 (8)
- May 2010 (8)
- April 2010 (24)
- March 2010 (27)
- February 2010 (16)