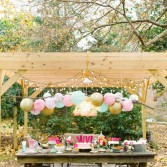
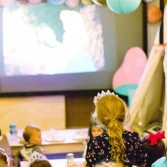
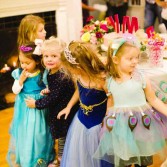
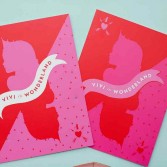
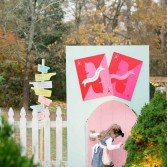
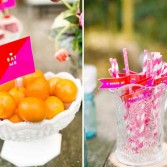
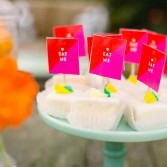
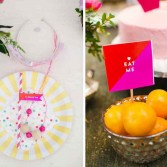
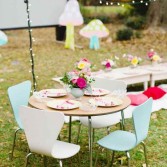
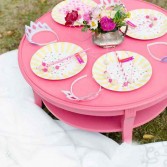
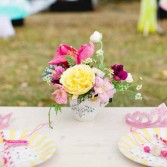
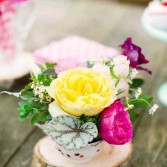
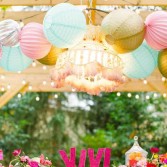
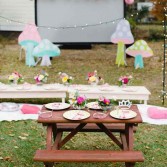
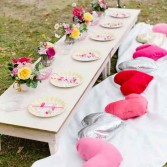
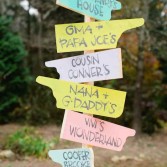
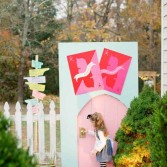
Alice in Wonderland is maybe of one of the most favorite children’s book heroines ever and Disney’s characters along with Ariel and Belle. It’s so good to see that over the years the story of a little curious girl who followed the white rabbit is still popular and loved by modern kids. Today’s photos from Vivi’s 4th birthday party also prove that it can be a wonderful theme to choose. The plan was to watch Alice in Wonderland under the stars, with twinkling lights all around. Sounds so cozy, right? Everything in décor looks perfect, but my favorite detail is probably this miniature door “Vivi Wonderland” – so cute! Take a look to all of the photos, they’re so enjoyable and inspiring!
Creative Alice In Wonderland Kids’ Birthday Party
Tue, Feb 3, 2015 | Party theme


Advertisement |
The Best Kids Room Furniture and Designs of January 2015
Tue, Feb 3, 2015 | Best of Kidsomania
Here are the best kids room design ideas that we were covering on Kidsomania during January 2015. If you’ve missed them than don’t hesitate to check them out.
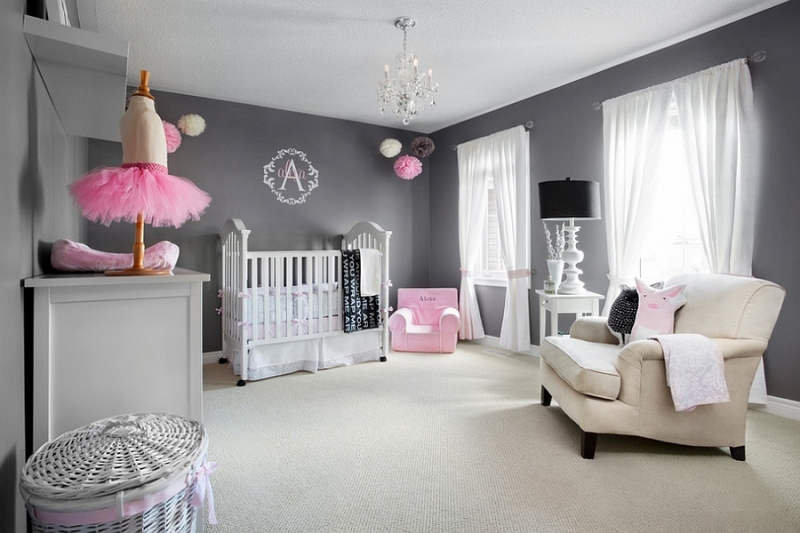 |
30 Awesome Grey Baby Nursery Decor Ideas |
 |
Danish-Scandinavian Kids’ Bedrooms By OYOY |
The Best DIY Projects For Kids of January 2015
Mon, Feb 2, 2015 | Best of Kidsomania
Here are the best DIY projects to make them for your kids or with them that we were covering on Kidsomania during January 2015. If you’ve missed them than don’t hesitate to check them out.
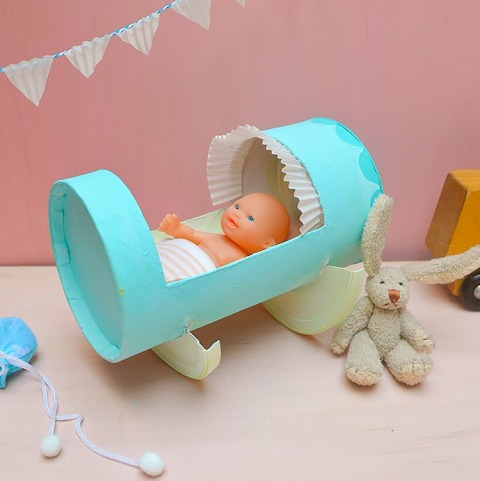 |
Cute DIY Recycled Doll Cradle For Kids |
 |
Fantastic DIY Glitter Snow Globes |
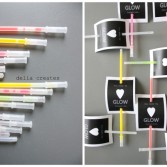
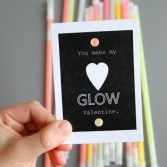
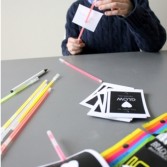
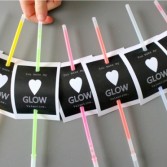
DIY Glow Stick Valentines For A Kids’ Party
Sat, Jan 31, 2015 | DIY Projects
These original Valentines will be perfect gifts for your kids’ friends at Valentine’s Day parties. It’s a very simple and fast craft! You will need printable templates, paper, glow sticks and hole punch. First of all you and your kids need to pick up templates. You can create it by your hands with a computer program or find versions on the Internet. Don’t forget to write the To and From on the back. Then you need to print them. Next punch holes at the top and bottom. And pop a glow stick in each one. And your kids’ Valentines are done. Have a happy hearts day!
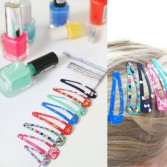
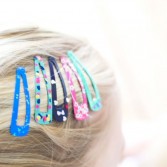
Easy DIY Nail Polish Hair Clips To Make With Your Girls
Fri, Jan 30, 2015 | Accessories, DIY Projects
Today’s DIY is special for girls, so gather your little ladies together and let’s get crafty! It’s very simple, yet rather creative and entertaining. Here’s what you need to gather: any hair pins of clips you have, nail polishes of any colors of your choice, piece of paper to pin hair clips and pins on and some glitter and gems. The tutorial couldn’t be easier: just slide the clips on a sheet of paper and paint them with nail polish. You can let your imagination run wild and create tons of different designs, using various colors, extra glitter and gemstones. Give it a try and have fun!
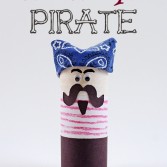
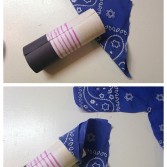
Fantastic DIY Cardboard Tube Pirate
Fri, Jan 30, 2015 | DIY Projects
Do your kids love pirates? Now they can make one of them with their hands! You will need 4-inch cardboard tube, black and white paper, red and peach crayon, 2 googly eyes, 5-inch square piece of bandana or fabric, scissors, hot glue gun, glue stick and black marker. Glue the edges of the black and white paper together. You will need 1 1/2 inches of black and 2 1/2 inches of white. Color the top 1 1/2 inches of the white paper with a peach crayon. On the remaining white paper, draw red stripes. Glue the finished paper around the cardboard tube. Fold the fabric square in half, point to point, to create a triangle. Lay the peach end of the cardboard tube onto the straight edge of the fabric. The rest of the tutorial is here.
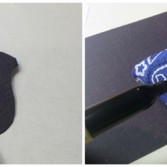
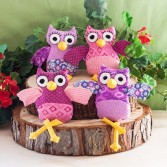
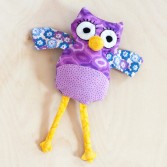
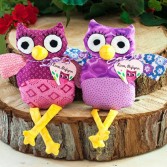
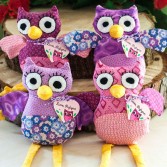
Adorable DIY Owl Plushies To Make For Your Tot
Thu, Jan 29, 2015 | DIY Projects, Toys
Aren’t these owl plushies adorable? I think any tot would love to have such a toy in his or her collection and hug it to sleep. There’re still enough time before Valentine’s Day, so if you’re looking for a thoughtful gift for the kids in your life, make these charming owls! It will probably take several evenings from you to make them, but the result is totally worth it. Here’s what you need: owl plushie pattern, cotton fabrics (choose different colors for every part of the owl’s body for more fun), black embroidery floss, cotton stuffing, rice, needle and thimble. Head over to adventures-in-making.com for the pattern and step-by-step instructions. Have fun!
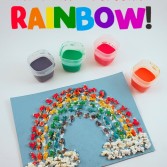
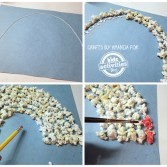
Colorful DIY Milk Paint Popcorn Rainbow
Thu, Jan 29, 2015 | DIY Projects
We are sure that your kids love art projects. So show them how they can create a beautiful rainbow from popcorn. You will need light blue construction paper, popped popcorn, milk, food coloring, small paintbrush and white glue. Draw a simple half circle onto the paper and line the top with white glue. Press the popcorn into the glue and continue until you have six layers. Mix food coloring into the milk to create red, orange, yellow, green, blue and purple. Use a small paintbrush to drop milk paint onto the popcorn. Glue unpainted popcorn to the ends of the rainbow as clouds. That’s all! Enjoy your artwork!
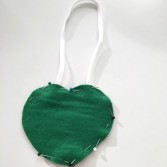
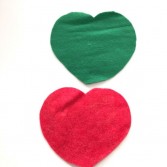
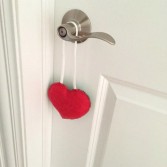
Smart DIY Stop/Go Toddler Sign For A Nursery
Wed, Jan 28, 2015 | DIY Projects
When I see DIY ideas like that, I just want to applaud, really, because it’s genius! Mom of little miss H had a bit of a struggle, while in the midst of bedtime her daughter wanted to come into her twins nursery again and again. Obviously, she woke them up and mom had to spend another hour trying to calm everyone down. She came up with a solution, which avoids telling miss H “no” constantly, and put together a sign of sorts. So, if you ever faced that problem, just make this! You only need red and green felt, roughly 12” of ribbon, thread or embroidery floss and a needle, straight pins, stuffing, paper and a shape to make a pattern. Read the full instructions at hellobee.com and good luck!
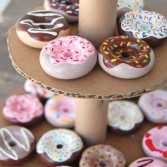
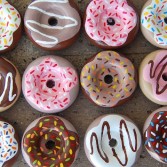
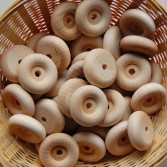
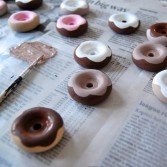
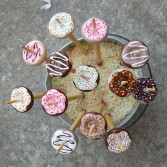
Amazing DIY Donut Toys For Your Kids
Wed, Jan 28, 2015 | DIY Projects
No doubt that everyone loves donuts! Don’t be afraid you don’t need to bake them. Today we offer you to create them with various supplies. We are sure that your kids will help you! So for this project you will need just little wooden wheels, acrylic paint, paintbrush and toothpicks. Paint the little wheels in shades of dough. Two coats later, let the wheels dry overnight. On next day paint on frosting (also two layers). Now you should add sprinkles. You can make it with toothpicks. After all you need to varnish your donuts. Next steps of the instruction are here.
Categories
Archives
- May 2015 (29)
- April 2015 (44)
- March 2015 (42)
- February 2015 (38)
- January 2015 (41)
- December 2014 (31)
- November 2014 (41)
- October 2014 (46)
- September 2014 (41)
- August 2014 (41)
- July 2014 (44)
- June 2014 (38)
- May 2014 (39)
- April 2014 (43)
- March 2014 (39)
- February 2014 (38)
- January 2014 (43)
- December 2013 (37)
- November 2013 (39)
- October 2013 (47)
- September 2013 (38)
- August 2013 (44)
- July 2013 (42)
- June 2013 (38)
- May 2013 (42)
- April 2013 (44)
- March 2013 (42)
- February 2013 (40)
- January 2013 (41)
- December 2012 (31)
- November 2012 (45)
- October 2012 (57)
- September 2012 (39)
- August 2012 (45)
- July 2012 (39)
- June 2012 (8)
- March 2011 (8)
- February 2011 (7)
- October 2010 (8)
- September 2010 (20)
- August 2010 (21)
- July 2010 (6)
- June 2010 (8)
- May 2010 (8)
- April 2010 (24)
- March 2010 (27)
- February 2010 (16)