It’s the funniest activity for your boys ever! And the easiest too, so this craft has many advantages. The supplies needed are 2″ diameter PVC pipes. Two inches is a good size cause it fits ping pong balls, golf balls and matchbox cars. The elbow is fun because it makes the balls and cars “jump” at the end of the chute. You and your kids can talk about how fast various kinds of balls travel, change the angle of the chute to see how that impacts movement. So if you and your kids need to stay at home, now you can play in this indoor game!
Entertaining DIY Ball And Car Chute For Boys
Thu, Apr 16, 2015 | DIY Projects


Advertisement |
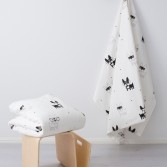
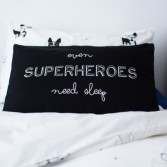
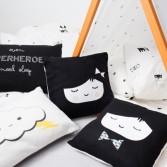
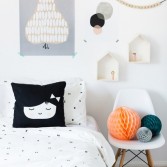
Funny Scandinavian Style Kids’ Bedding From Frankie And Frenchie
Wed, Apr 15, 2015 | Bedding
If you loved the black and white boy’s room photos which we have recently shared, you definitely gonna love this bedding. Frankie and Frenchie brand with Minie and Dee designers behind it follows the latest trends and loves the simple Nordic style designs. All of the bedding is black in white sometimes with a few yellow touches and sweet motifs of clouds, superheroes or dogs. The design looks incredibly modern, lovely, attractive and very funny for kids. What is more, the brand really cares about the quality, so all of the bedding is made from 100% organic textiles, which makes it not only trendy but also comfortable and long lasting. Be sure to check this out!


Fun DIY Birthday Cake Gift Box For Kids’ Parties
Wed, Apr 15, 2015 | DIY Projects
Are you preparing for a birthday party for your kids? Take a look at these cool gift boxes for the guests of the party! To make them you will need cardstock in a variety of colors, Cricut Explore™, Cricut Scoring Stylus, paper straw, tissue paper, glue stick and hot glue gun. Open up this project in Cricut Design Space. You’ll need to insert your scoring stylus in the machine first, then follow the instructions for loading and cutting and scoring your box and cutting your cake strips and sprinkles. Fold along all scored lines of your box. Run a glue stick along the tab at the front point of the cake and glue to the opposing side. Glue the bottom triangle of the cake to the corresponding tab. The rest of the tutorial is here.


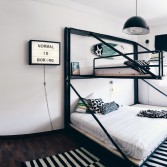
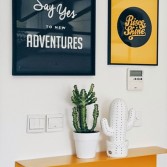
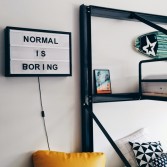
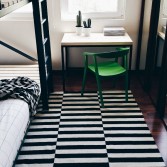
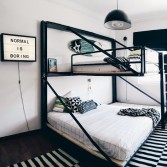
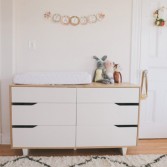
Stylish Black And White Boys’ Room With Yellow Accents
Tue, Apr 14, 2015 | Kids room
What do boys want most of all? To sleep comfortably and have some privacy. This basically was the starting point of Live Loud Girl, the designer of today’s awesome room. “Normal is boring” is her mantra, so the design turned out anything but ordinary. It’s gorgeously modern, masculine in a way and really stylish! I’m absolutely in love with black and white color scheme with just a few shiny yellow pops of color and perfectly modern patterns here and there. The bunk bed is just so extraordinary and so cool! I bet boys loved the room instantly. Take a closer look to all of the photos and get the inspiration!


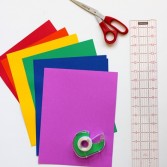
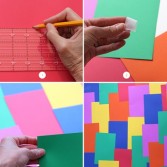
Bright DIY Rainbow Photo Booth Backdrop For A Kids’ Party
Tue, Apr 14, 2015 | DIY Projects
If you wanna find some new ideas for kids’ parties, continue reading! Everybody loves to be photographed, of course your kids aren’t an exception. Prepare this rainbow backdrop for them, and the party will be perfect for all the guests! For this project you will need 8.5 x 11 paper (card stock), scissors, tape and large foam core board or wall. Let’s start! First of all you should measure and cut paper in half. Then lay out paper in random color order starting from top. Next you can tape to wall or board using tape. That’s all! Now you can take amazing and funny pictures!


Lovely DIY Cardboard Polka Dot Tulips To Make
Mon, Apr 13, 2015 | DIY Projects
Spring lets our creative juices flowing, doesn’t it? If you feeling crafty today, ask your kids to join you for this awesome DIY tutorial of beautiful polka dot tulips. It’s inexpensive, easy peasy to make and as a result you get such a pretty handmade décor piece to display. Here’s the list of needed supplies: 4 (4”) cardboard tubes, 8 (12”) wooden dowels, paint in pink, yellow, purple, green, teal and white colors, paintbrush, scissors and hot glue gun. Ready to begin? First paint each cardboard tube, inside and out and allow to dry for like 20 minutes. Read the next simple steps at craftsbyamanda.com and enjoy!


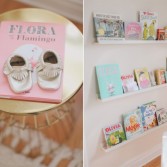
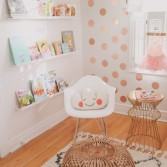
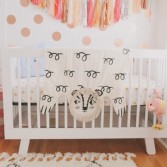
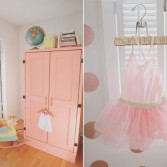
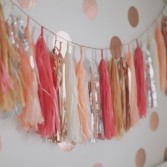
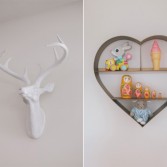
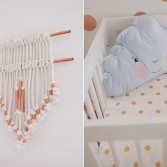
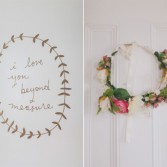
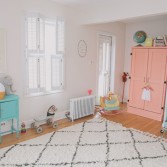
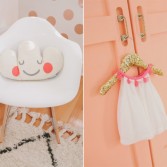
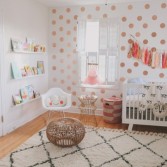
Pretty And Modern Glam Baby Girl Nursery Inspiration
Sat, Apr 11, 2015 | Kids room
Such lovely and pretty nursery photos we have for you today! If you’re in seek of some girly room inspiration, which isn’t too sugary sweet yet modern and cool, you’ll get plenty of ideas by just looking at this baby Paige’s wonderful space. It’s just a sheer cuteness with all those whimsy and fun elements like a cloud pillow and colorful garland above the crib. I’m in love with golden polka dot wallpaper, which adds just a bit of glam to the space, and all of the art prints here and there, so nice and simple. A nursery like that can grow with a child, because its style is so utterly chic and awesome, even the teen girl would love it. Enjoy the photos!


Colorful DIY Mailman Bag To Play With Your Kids
Fri, Apr 10, 2015 | DIY Projects
This idea is a great way to explain various types of professions to your kids. You can start with a mailman and his bag. You’ll need duct tape in various colors, cutting mat, cereal box, scissors, sharpie, craft knife, ruler and stapler. First trim your cereal box. Cover your cereal box with duct tape. Now it’s time to add your letters and any other decorative items. To cut out your letters and shapes, pull off a piece of duct tape and stick it to your cutting mat. Use a craft knife to trim the tape and cut out your letters. Now make the strap. First, stretch out two pieces of duct tape and lay them so that one is slightly on top of the other. Repeat this with two other pieces. Read the next steps of the tutorial here.


DIY Faux Metallic Oversized Initial For A Kids’ Room
Fri, Apr 10, 2015 | DIY Projects
If you are thinking how you to decorate your kids’ room and wanna find an original idea, this craft is for you! For this project you will need 20″ x 30″ sheet foam board, tape, metallic-finish spray paint, scotch tape, packing tape, string, X-acto knife, scissors and paper cutter. In a word editing program (MS Word, Google Docs or even Adobe Illustrator) create a new 8.5″ x 11″ document. Type your initial in a typeface of your liking. Increase the font size to fill most of the page and color the initial a medium gray to save ink when printing. Open your file in Adobe Acrobat and print out your pages. Lay out the pages and piece together with tape. The papers will overlap, so you’ll need to cut off the excess margins using a paper cutter. The rest of the tutorial is here.


Fancy DIY Drawer Pulls For Kids’ Rooms
Thu, Apr 9, 2015 | DIY Projects
Instead of dishing out the money for a fancy and expensive drawer, personalize a simple one the way you like. For example, you can add some funny drawer pulls like these golden plastic toy animals. It’s totally doable and easy, so gather the supplies and let’s get to work! Here’s the list of supplies that you need: drill, plastic objects (toys, buttons, jewelry or else), gorilla glue, hanger bolts, washers, nuts and spray paint. So, first of all determine which will be the backside of your knob and place a mark where you plan to drill the hole. Choose the appropriate size drill bit and carefully drill into the piece. Read the next steps at apartmenttherapy.com and enjoy!


Categories
Archives
- May 2015 (29)
- April 2015 (44)
- March 2015 (42)
- February 2015 (38)
- January 2015 (41)
- December 2014 (31)
- November 2014 (41)
- October 2014 (46)
- September 2014 (41)
- August 2014 (41)
- July 2014 (44)
- June 2014 (38)
- May 2014 (39)
- April 2014 (43)
- March 2014 (39)
- February 2014 (38)
- January 2014 (43)
- December 2013 (37)
- November 2013 (39)
- October 2013 (47)
- September 2013 (38)
- August 2013 (44)
- July 2013 (42)
- June 2013 (38)
- May 2013 (42)
- April 2013 (44)
- March 2013 (42)
- February 2013 (40)
- January 2013 (41)
- December 2012 (31)
- November 2012 (45)
- October 2012 (57)
- September 2012 (39)
- August 2012 (45)
- July 2012 (39)
- June 2012 (8)
- March 2011 (8)
- February 2011 (7)
- October 2010 (8)
- September 2010 (20)
- August 2010 (21)
- July 2010 (6)
- June 2010 (8)
- May 2010 (8)
- April 2010 (24)
- March 2010 (27)
- February 2010 (16)