When I was a kid I used to love making cookies with my grandma. Wearing an apron, hands dirty with flour and sugar… It was so much fun! You can arrange something like that, too, and make these sweet treats looking like dresses with your daughter or granddaughter. They’d be great for a birthday party, baby shower or anything else like that. There’s nothing difficult in making them, you only need sugar wafer cookies, ½ cup frosting to match the cookie color, pearl or white decorator candies, a serrated knife and a pastry bag. Head over to handmadecharlotte.com for the recipe and enjoy!
Fabulous DIY Sugar Wafer Dress Cookies To Make With Kids
Thu, May 28, 2015 | Food


Advertisement |
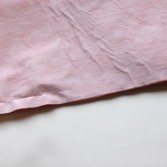
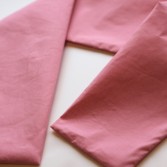
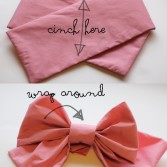
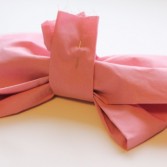
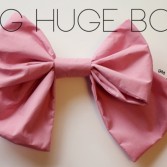
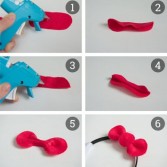
Pretty DIY Big Huge Pink Bow For Girls
Tue, May 26, 2015 | DIY Projects
All girls love to play with dolls, but what your daughter will say if you make a real doll costume for her? We are sure that she’ll like it! So today we show you how you can make huge bow for doll look. You will need fabric, scissors, pins, needle and thread. First, cut out your pieces, two rectangles and fuse interfacing to them. Then fold your large piece in half, hot dog style, and sew it up. You’ll want to leave a 5″ or wider opening in the middle of the piece. Use a 1/2″ seam allowance. Then turn it and press. Make sure to fold in the opening and press it, too. The rest of the tutorial is here.

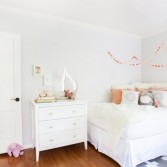
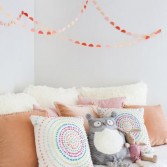
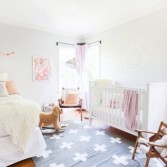
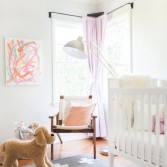
Soothing Yet Playful Baby’s Nursery With Pink And Peach Accents
Fri, May 22, 2015 | Kids room
Hey there, dear readers! We’ve got such a lovely nursery design to show you today! It’s a professional project for baby Schuyler, who is 17 months now. The room has great natural light, so the main idea was to stay in a light, almost white color scheme and fill the space with colorful accents for a bit of contrast. My first thought was that it’s a parents’ bedroom redesigned for a little one to live there too, but in fact the bed here is a lounge for Schuyler to read, play and cuddle with her favorite people. Such a nice idea, huh? The room feels modern, fun and unique, and we really love its personal touches like the sweet Labradoodle rocker as a miniature of the family’s real pet. Enjoy the photos and get inspired!

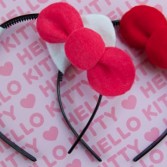
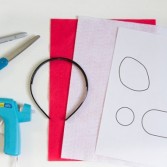
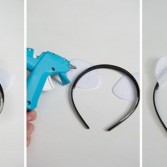
DIY Hello Kitty Party Headband For Your Kids
Thu, May 21, 2015 | DIY Projects
Hello Kitty theme is a very cool theme for birthday party cause every kid loves cute Hello Kitty! So let’s start to create awesome headbands for your daughter and her guests. For making this headband you’ll need pink and white felt, headband, marker, scissors, hot glue and Hello Kitty bow and ear template. First print off and cut out the Hello Kitty bow and ear template. Next, trace the pieces on the felt and cut them out. Lay out your ears and then put your headband on top, making sure to keep them lined up evenly. Then add hot glue around the edges and fold into place. The rest of the tutorial is here.

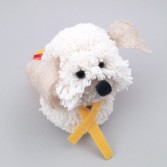
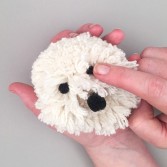
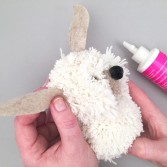
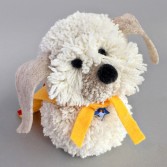
Fluffy DIY Shaggy Dog For Your Kids
Wed, May 20, 2015 | DIY Projects
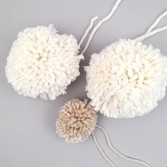
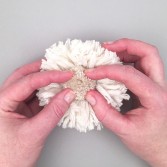
This puppy is really cute, so if you aren’t ready for a real one, make this shaggy dog for your kids now! You will need soft fluffy wool yarn, pom pom makers, various sized store-bought pom poms, felt, scissors and quick-drying fabric glue. First make 2 large and 1 smaller pom pom using your yarn and pom pom makers. The two large pom poms will be the “head” and “body” pieces, and the smaller one will eventually be the “snout”. Select one of these and wrap a long piece of yarn around a generous portion of the pom pom to tie it off. Hold the pom pom by the tuft you’ve just created and trim around the back of the pom pom to clean up the wool ends. Next steps of the instruction are here.


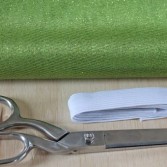
Sweet DIY Cherry Blossom Patterns To Practice Motor Skills
Tue, May 19, 2015 | DIY Projects
Today’s craft allows your kid to practice fine motor skills and pattern activity. It’s spring-inspired, so right now is the perfect time to do that! Here’s the list of supplies that you need for this project: pink tissue paper, green felt, hole punch and a few twigs from the yard. Begin with cutting small leaves from a sheet of green felt. Then with a hole punch make holes in each leaf. There your kid might need a little help, because felt material requires quite a lot of hand strength to punch a hole. Visit sugaraunts.com to see the next steps of the tutorial and finish them. Enjoy!


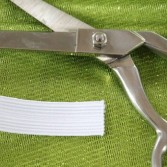
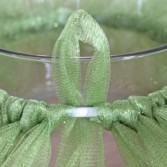
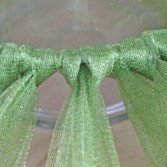
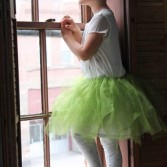
Cute DIY Ballet Tutu For Little Girls
Tue, May 19, 2015 | DIY Projects
There are so many ways to make a ballet tutu and we found a new one! So if your girl likes to dance and wants to be a ballerina, continue reading. For this project you’ll need 1/2 inch elastic, sharp scissors or a rotary cutter and mat, sewing machine with a 90/14 universal needle, coordinating thread, round bowl or large can and 5 yards of tulle for a child-size tutu. Measure around your ballerina’s waist and subtract 2 inches from that number. Cut a strip of elastic to this measurement. To create the waistband, overlap a 1/2 inch on the ends of the elastic and sew them together using a 90/14 needle and a medium zigzag stitch. The rest of the tutorial read here.


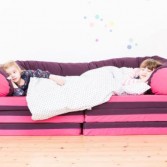
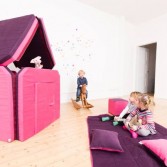
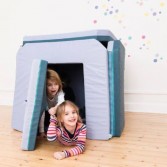
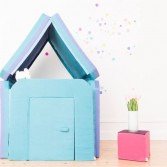
Awesome Nest Rocker’s Padded Playhouse For Kids’ Indoor Fun
Mon, May 18, 2015 | Play houses
When I was little, I used to love to build things: a teepee of sorts, a fort from pillows, etc. It was so much fun! In modern world our kids are so drawn to electronic devices, they spend less time just playing with each other or on their own, using their imagination. Germany’s Nest Rocker has created these brilliant padded playhouses that might get your children pretty excited of the things they can create with it: a playhouse, a couch, etc. It’s completely easy to join these pads together using velcro fasteners to build a perfect little indoor cubby. Looking at the pictures below it’s obvious that kids love this so much! Be sure to check out!
Funny DIY Bubble Wrap Rainy Cloud For A Nursery
Sat, May 16, 2015 | DIY Projects
This craft is totally amazing and so cute! You don’t need many details and too much time to create this décor element for your kids’ room. For this craft you will need old bubble wrap, paint (white, black and blue), paper (two large sheets of white), wool or string, contrasting paper or pens, stapler, old plastic bags for stuffing and a little glue. Start with printing grey cloud. Just put lots of white and a little black onto bubble wrap and using paint brushes cover the whole sheet of bubble wrap. Then press it down onto the white paper and carefully peel it off. Next steps of the instruction are here.


Calm Yet Creative Woodland Themed Baby Nursery Design
Fri, May 15, 2015 | Kids room
We love discovering new and fresh kid’s rooms themes, and today we’ve got a perfect woodland nursery design to share. It’s a bit rustic, a bit boho, a bit vintage with a mix of soft organic and handmade pieces. The designers, mom and dad of a tot, started planning the room style with this woodland wallpaper. Then they added some key furniture pieces and filled the space with a few, well considered pieces, which fit into the theme. The space turned out to be really calm, warm and at the same time imaginative and creative, which is great for a baby. Take a closer look to the photos of this space and get inspired!


Categories
Archives
- May 2015 (29)
- April 2015 (44)
- March 2015 (42)
- February 2015 (38)
- January 2015 (41)
- December 2014 (31)
- November 2014 (41)
- October 2014 (46)
- September 2014 (41)
- August 2014 (41)
- July 2014 (44)
- June 2014 (38)
- May 2014 (39)
- April 2014 (43)
- March 2014 (39)
- February 2014 (38)
- January 2014 (43)
- December 2013 (37)
- November 2013 (39)
- October 2013 (47)
- September 2013 (38)
- August 2013 (44)
- July 2013 (42)
- June 2013 (38)
- May 2013 (42)
- April 2013 (44)
- March 2013 (42)
- February 2013 (40)
- January 2013 (41)
- December 2012 (31)
- November 2012 (45)
- October 2012 (57)
- September 2012 (39)
- August 2012 (45)
- July 2012 (39)
- June 2012 (8)
- March 2011 (8)
- February 2011 (7)
- October 2010 (8)
- September 2010 (20)
- August 2010 (21)
- July 2010 (6)
- June 2010 (8)
- May 2010 (8)
- April 2010 (24)
- March 2010 (27)
- February 2010 (16)